Follow Us Behind the Scenes

In this post, we're going to walk you through our entire design process and show you how your order turns into the final custom product!
Step 1: Choose your drink container
This one is pretty simple and straight forward. We do have a variety of bottles, mugs and tumblers as well as various colors and sizes of each. Any of them can be custom engraved!
It is important to note that if you are choosing to get a photo engraved (graphic is different), we only engrave on the light colors (snow, sand, lavender, turquoise, skyblue & pink). The reason for this is because dark colors make the photos look inverted. We only want to provide the best quality results. We can still engrave logos, graphics, and names/text on dark bottles.

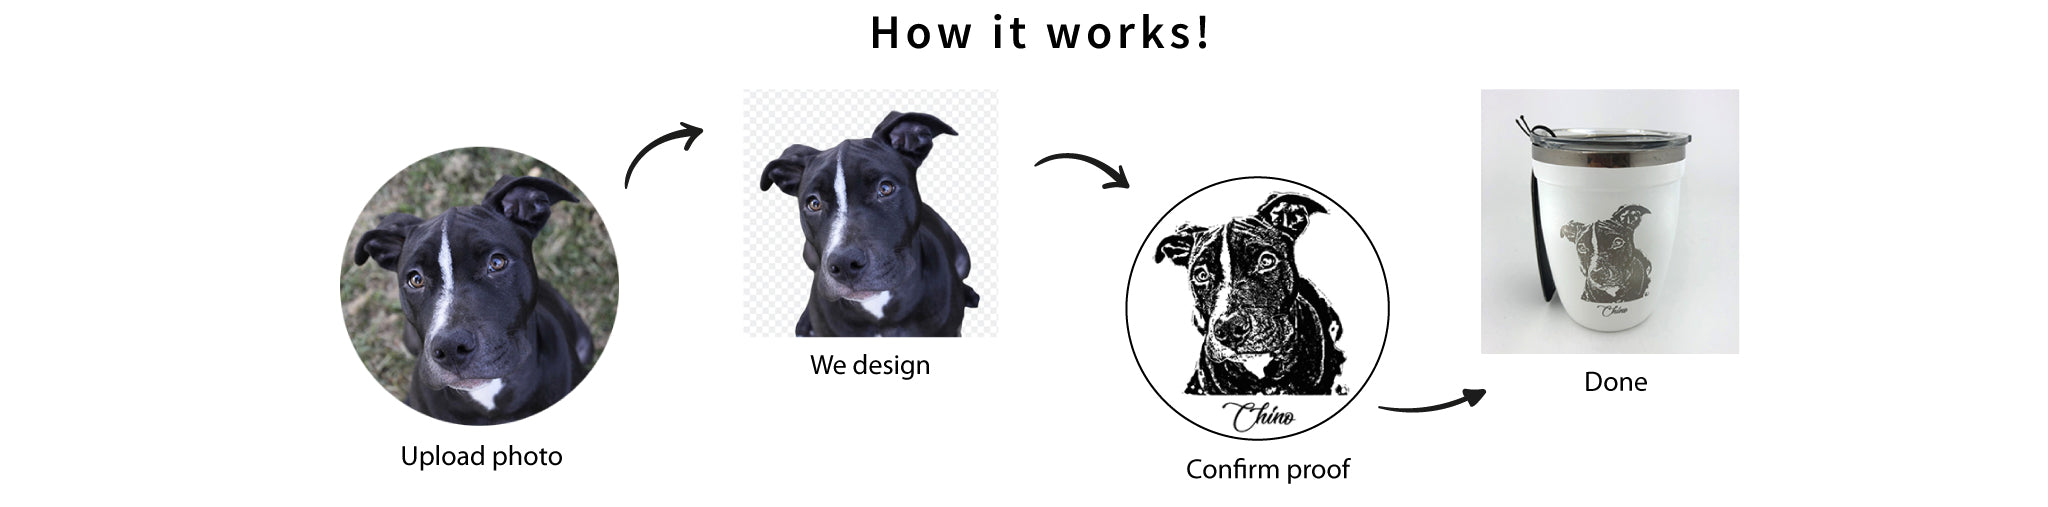
Step 2: Send us/upload your art
For this example, we will be choosing a dog photo. Our designer in store will show you how to send us the photo. For online orders, simply use the upload tool when you are on the photo engraving page.

Step 3: We design
During this process, our skilled designers will do all the work for you. We start by carefully removing the background and any distracting elements, leaving only what you want engraved. Next, we adjust the photo as necessary and further tweak the image in Adobe Illustrator in order to make it a readable file format for the engraving machine.

Step 4: Confirm proof ✔
Once the design is complete, we send a proof via email for you to preview. The proof will look something like this:

The proof shows what the design looks like, the outline of the product you chose, size, color and engraving area. The design you see in the proof shows exactly what will be engraved. The black parts is essentially what areas that will be engraved and when complete, will be the exposed steel. As soon as we receive confirmation of the design, we are able to proceed with engraving.
Step 5: Prep & engrave
From here, we prep the product and machinery, and watch the magic happen.

Step 6: Cleaning & polishing the final product
Since the laser actually removes the top layer of the powder coating, we're left with dust and a bit of colors on the steel. We remove the product from the machine, hand clean and polish it before packaging it up. Your product is now ready to be shipped out or picked up in store!

To get started on your photo engraving click the following links:
Share:
Top 3 Reasons To Customize Your LAMOSE Drinkware
New Feature: Gift Message